Index
Using a SecureCRT® Secure Shell Connection as a SOCKS
Proxy
At times the need arises to access a number
of devices that reside in a remote network behind a single gateway server.
One solution would be to establish an SSH connection to the gateway
server, and then issue another SSH connection from that server to each
of the devices via the remote shell. This can be problematic and time-consuming,
especially if more than two jumps are required. Fortunately, there is
a better way: dynamic port forwarding.
SecureCRT provides the ability to create an SSH connection with a dynamic port forwarding configuration that can then be used as a SOCKS proxy
to reach all machines within a remote network (behind the gateway).
Using an SSH SOCKS proxy, any application that is SOCKS 4 or 5 compatible
(including other sessions established with SecureCRT) will be able to
have their connections forwarded through this SSH SOCKS proxy and on to the desired
destination.
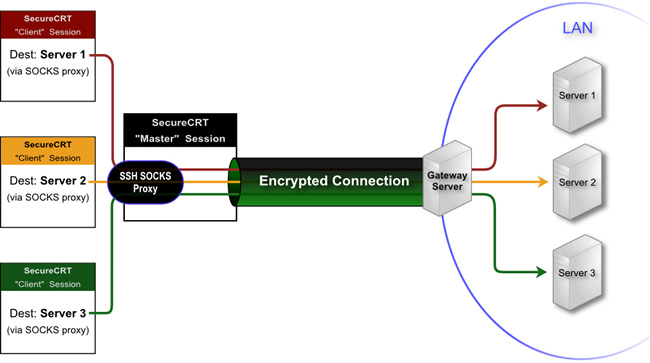
This tip focuses on using SecureCRT's dynamic port forwarding functionality with a "Master" session to create an SSH SOCKS proxy associated with a connection to a gateway server. Additional SecureCRT
sessions can then connect through the "Master" session's SSH SOCKS proxy to remote servers
that are located behind the gateway server. The graphic below illustrates this concept:
Configuring the "Master Session" to the Gateway Server
The first step is to configure a "Master"
session that can successfully connect via the SSH protocol to the gateway
server (also known as a "jump host"). This "Master"
session will then need to be modified to have a dynamic port forward configuration. A dynamic port forward is a listening port which acts as a SOCKS proxy that is automatically created when the “Master” session is used to connect to the gateway server. Note that the term “gateway server” used here refers to any SSH server that supports port forwarding functionality.
The configuration of a dynamic port forward is accomplished using the following steps:
- Set up an SSH session to the gateway server in SecureCRT.
- Make sure you set the Hostname field to match the hostname of your gateway SSH server.
- Name this session "Master" session (you can choose another name, but "Master" is used in this documentation as an example).
- Test your "Master" session to ensure that you can successfully connect and authenticate to the gateway SSH server.

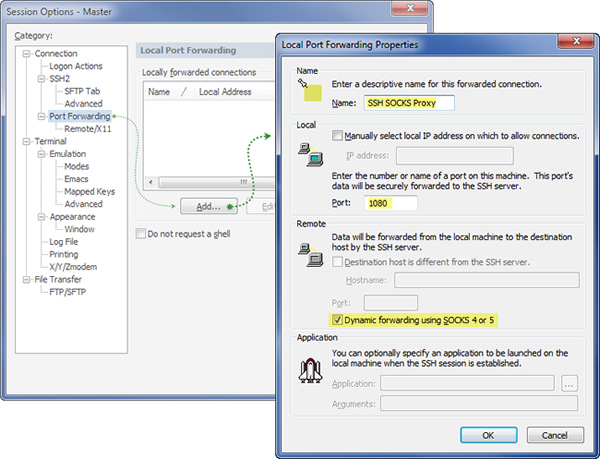
- Modify your "Master" session to have a dynamic port forwarding configuration.
- Open the Session Options dialog for your "Master" session.
- Select the Connection / Port Forwarding category, and then press the Add button.
- In the Name field, specify a unique description. For example, SSH SOCKS Proxy.
- Enter a value for the Local / Port field by entering a listening port value. Since this port forward will be used as a SOCKS proxy, it makes sense to specify 1080 (the standard SOCKS port).
- Enable the Dynamic forwarding using SOCKS 4 or 5 option (the other fields in the Remote category will not be used in this configuration).
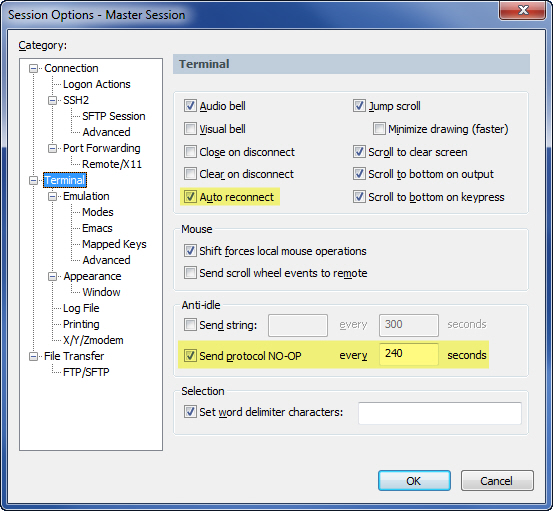
- Since this "Master" session will need to be connected and remain connected for all sessions that use the SSH SOCKS proxy, it would also be a good idea to make the following configuration changes to the "Master" session (both options are found in the main Terminal category of the Session Options dialog as depicted below):
- Enable the Send Protocol NO-OP option and specify an interval less than the idle timeout of the remote server or remote shell.
- Enable the Auto reconnect option so that if the connection goes down unexpectedly, SecureCRT will automatically attempt to re-establish the connection.
Configuring a Global Firewall/Proxy Setup in SecureCRT
Now that the dynamic port forward is set
up in the "Master" session, a global firewall configuration will
need to be created so that other SecureCRT sessions can use the SSH
SOCKS proxy. To set up a global firewall/proxy in SecureCRT:
- Open SecureCRT's Global Options dialog and select the Firewall category.
- Press the Add button and use the following configuration guidelines.
- Specify a Name for the firewall (for example: Gateway Firewall).
- Set the Type field to SOCKS version 5 (no authentication).
- In the Hostname or IP field, type: 127.0.0.1.
- Set the Port field to match what your "Master" session's dynamic port forward setup is configured to listen on (1080 as per previous example).
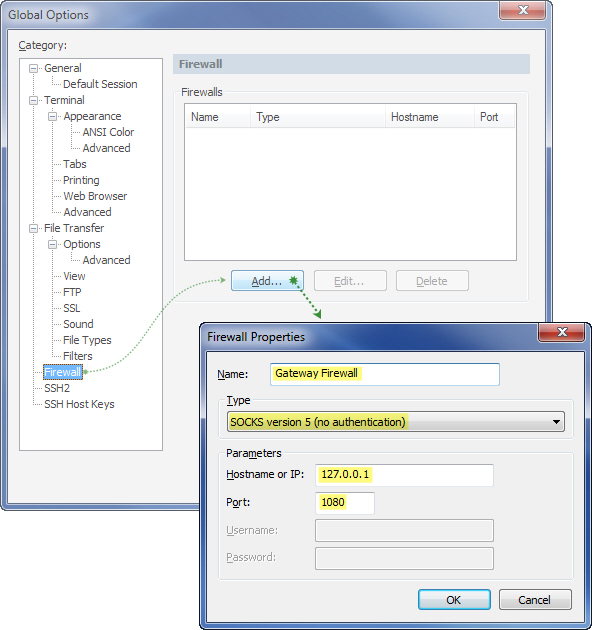
- After pressing the OK button on the Firewall Properties dialog, the new firewall configuration should appear in the Firewalls list within the Firewall category of the Global Options dialog, and can be used within other SecureCRT session configurations as well as from the Quick Connect window.
Configure a SecureCRT "Client" Session to Connect Through the SSH SOCKS Proxy
With a firewall/proxy configured as explained in the section above,
the Session Options dialog for a new or existing session should provide
the new firewall (named "Gateway Firewall" in the example) in the category
that matches the protocol being used. To elaborate, any session that
is configured to connect to the machines behind the gateway server can
use this firewall as the Firewall setting in the connection configuration
options, as illustrated below:
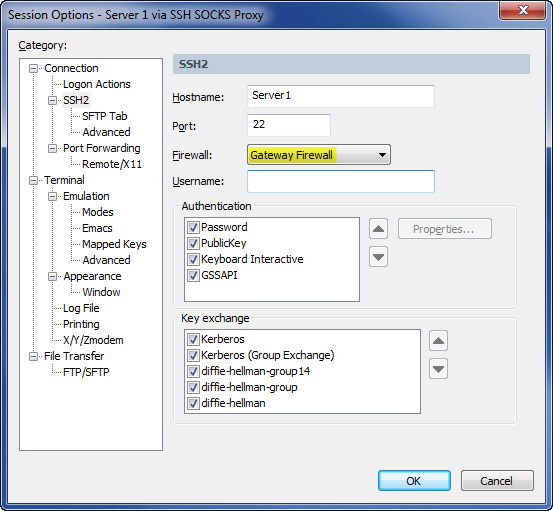
When connecting through an SSH SOCKS proxy, host name resolution occurs on the SSH gateway server. Therefore, you would specify the Hostname as it is known by the gateway server, which will be making the connection to the host on behalf of SecureCRT.
Putting Everything Together
Once "Master" and "Client"
sessions have been created as described above, the process of connecting
to a machine behind the gateway through the SSH SOCKS proxy is fairly
simple:
- Connect to the gateway machine using the "Master"
session.
In order to connect to machines in the gateway server's
LAN, the "Master" session must first be connected successfully.
Tip for Windows users: Some users may want to set up a shortcut in their Windows profile Startup folder to launch SecureCRT with the "Master"
session to allow for the "Master" session to be up and running
as soon as they log on to their Windows system. The shortcut's Run
property can be set to Minimized to
ensure that the SecureCRT application is started in a minimized state.
- Connect to machines located within the gateway server's LAN.
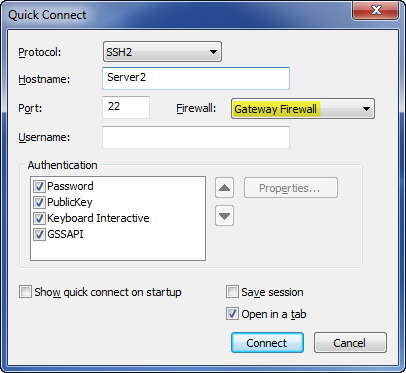
In
the example session configuration described earlier, a session was
created and saved with a configuration instructing SecureCRT to use
the SSH SOCKS proxy provided by the "Master" session.
However, using a saved session isn't a requirement. It's just as easy to bring
up the Quick Connect dialog, specify the remote host name, and select
the SSH SOCKS firewall/proxy configuration as the firewall to use
(see the graphic below). With a press of the Connect button, a connection
through the SSH SOCKS proxy will be initiated.
Taking it a Step Further: SSH SOCKS Proxy "Chaining"
In some network configurations, there may be a need to access a secondary network through another gateway machine on the primary remote network. If you have to go through one gateway server and connect to another gateway server before you can reach your ultimate destination, you might be interested in "chaining" SSH SOCKS proxies, as depicted in the graphic below.
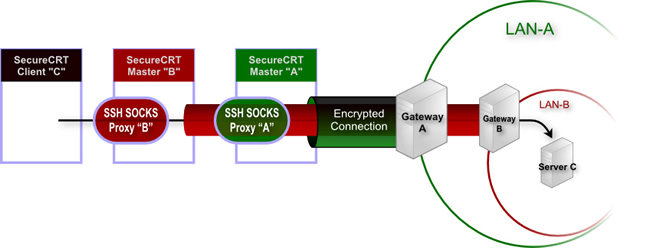
Once you have a "Master" session in place that gets you to your first gateway machine and sets up the first layer's SSH SOCKS proxy, follow these general steps to "chain" a secondary SSH SOCKS proxy through a primary SSH SOCKS proxy:
- Create a "Secondary Master" session that connects to the secondary gateway machine through the SSH SOCKS proxy that is provided by the "Master" session. For example:
- Set the Hostname field to match the name of the secondary gateway machine (Gateway B in the picture).
- Configure the Firewall field to match the name of the firewall you created earlier (Gateway Firewall) so that the "Secondary Master" session connects through the "Master" session's SSH SOCKS proxy.
- Configure the "Secondary Master" session's Port Forwarding category with a dynamic forward that listens on a port that is different than the "Master" session's SSH SOCKS proxy. In our earlier example, the "Master" session's dynamic forward SOCKS Proxy was configured to listen on the default SOCKS port, 1080. Your "Secondary Master" session must listen on a different port since port 1080 is already bound to the "Master" session's SSH SOCKS proxy listening port. As one example, you could use port 11080.
- Create a new firewall configuration in the Global Options dialog in similar fashion as is described in our earlier example (See the "Configuring a Global Firewall/Proxy Setup in SecureCRT" above), with the major differences being the name of the firewall (i.e., "Secondary Gateway Firewall") and the port (port should match the one you chose in step 1c immediately above).
Once you have the "Secondary Master" session and corresponding firewall defined within SecureCRT's global options, you can connect to a third-tier machine behind the second gateway machine using these steps:
- Connect to the "Master" session (if not already connected).
- Connect to the "Secondary Master" session (if not already connected).
- Connect to the actual host name of the third-tier machine (Server C in the picture), using the global firewall definition (named “Secondary Gateway Firewall”) that corresponds to the "Secondary Master" session's dynamic port forward.
How Do I Modify Port-forwarding Filters in SecureCRT
By default, only connections coming from the loopback adapter (127.*) on the SecureCRT machine are allowed to connect to the SSH SOCKS proxy port. To change the port-forwarding filters so other machines or interfaces are allowed to connect, see the FAQ:
How do I modify port-forwarding filters in SecureCRT?