Index
How to Use Logon Actions to Connect to a Secondary Host Behind a Jump Host or SSH Gateway
Do you need to connect through a jump host / SSH gateway server to reach another host behind that server?
First, watch this video about SecureCRT's Dependent Sessions (Jump Host) feature.
If the SSH2 server on your jump host does not support port forwarding, then you can use the techniques described below to help you get connected to secondary host.
Here is the general initial setup pattern:
- Test SecureCRT's Dependent Sessions functionality (see the video mentioned above). If the Dependent Sessions functionality works, skip the approach described below, and use dependent sessions since that is the simplest and best interaction possible.
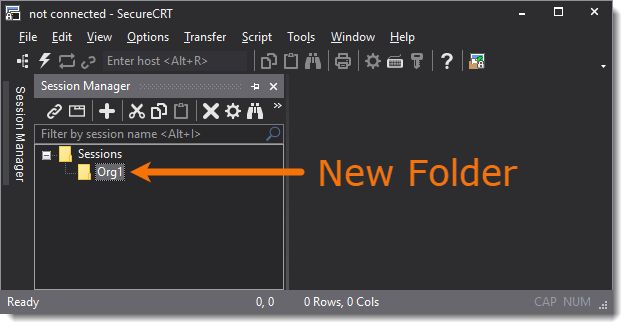
- If SecureCRT's Dependent Sessions functionality does not work, follow the steps below. First, create a folder in the Session Manager that will house all of the sessions that will use the same jump host.
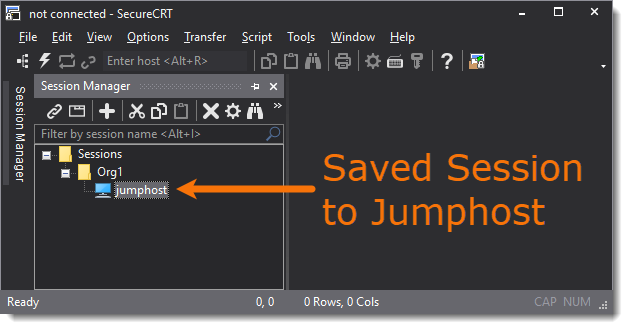
- Create a saved session to your jump host (if you already have a session to your jump host, just create a copy of it), and place it in the new folder you created.
Although it's not a security best practice, many individuals—for the sake of convenience—insist on being able to store username and password as part of the session configuration. If you're inclined to save credentials for the jump host, do so by saving them in the Session Options's SSH2 category for your jump host session as shown here:
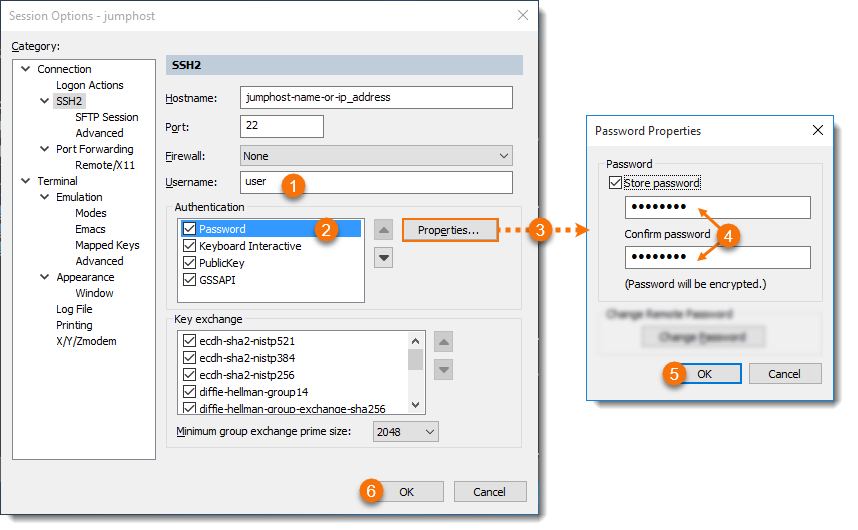
The username and password stored as shown above are used to authenticate to the jump host. Later on, this tip will address where to store credentials (if you decide to do this) for authenticating to the secondary host.
- Connect to your new jump host session. Once you are at the point where you'd normally type in your ssh user@host command, take a look at the last few characters of the shell prompt on that line. In this case, the shell prompt of the jumphost looks like this:
[user@remote-host:~] <== Note that there's a trailing space here
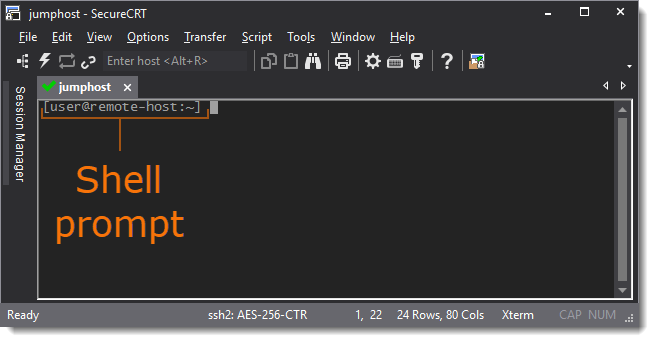
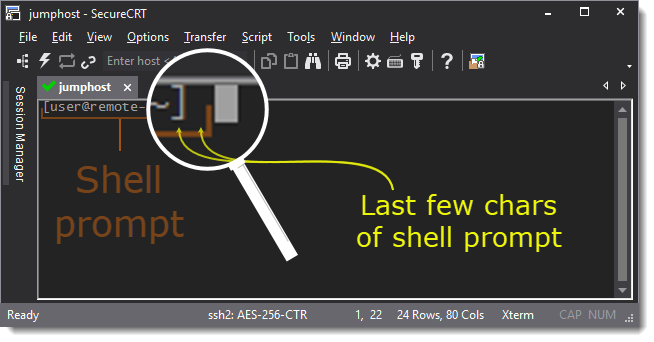
Make a note of the last few characters of your shell prompt. In this case, I'd use the last two right-most characters of the shell prompt "] ".
Note that this example includes the trailing space character, since the blinking cursor is one space/column away from the closing ] in the jump host shell prompt. When you connect to your jump host, if the shell prompt shows the cursor blinking immediately next to the last character of the shell prompt, then you should not include a trailing space.
This information is needed later on when driving the automated process of connecting to the secondary host.
- Edit the properties of the current session Options / Session Options.
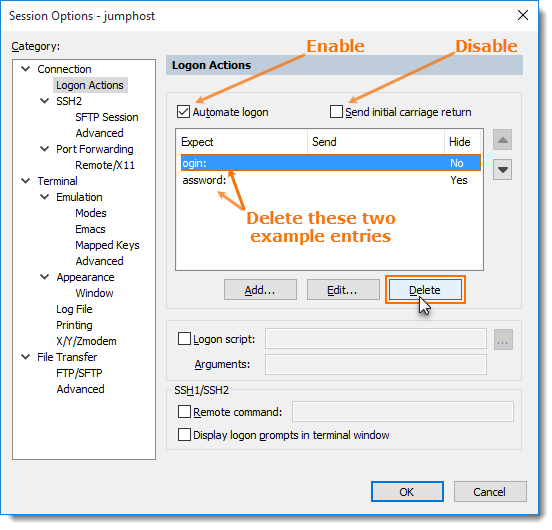
- In the Connection / Logon Actions category,
- Enable the Automate logon option
- Disable the Send initial carriage return option
- Delete the first two entries in the Expect…Send listing. They're there to show you an example.
- Press the Add… button to create a new Expect…Send entry.
- In the Expect field, enter the last few characters of the shell prompt. You're telling SecureCRT what to look for to know it's ready to send commands.
- In the Send field, enter the ssh user@host command, using the exact username and hostname/IP you need to reach the secondary host.

- Press the OK button.
- Press the Add… button again to create yet another new Expect…Send entry.
- In the Expect field, enter the last few characters of the password prompt. Use something like "word:" here, because it may be that some hosts use "Password:" with a capital letter, and others may present "password:" with lower-case p.
- Enable the Hide option below the Send field so that others in your vicinity will not be able to see the super secret password you're entering here.
- In the Send field, enter the password required to authenticate to the secondary host you entered in the earlier Expect…Send entry.
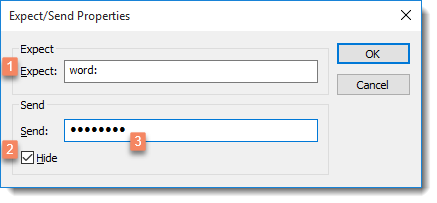
- Press the OK button.
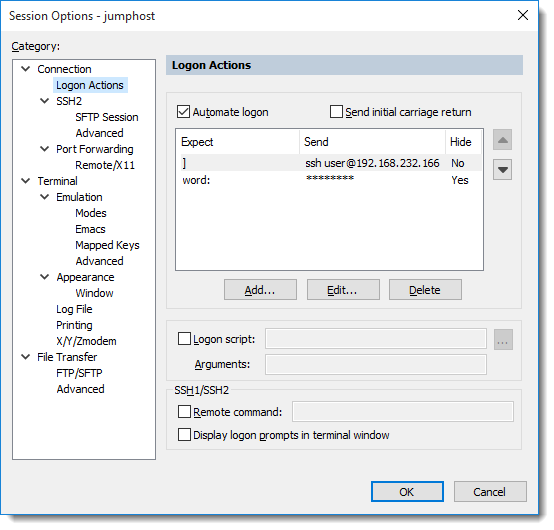
- Review the Logon Actions work you've done so far. You should see one row/entry that is waiting for (Expect) the last few characters of your jump host's shell prompt, and sending the ssh user@host command that will get you to the secondary host, and another row/entry that is waiting for (Expect) the last few characters of the password prompt, and Sending the password.
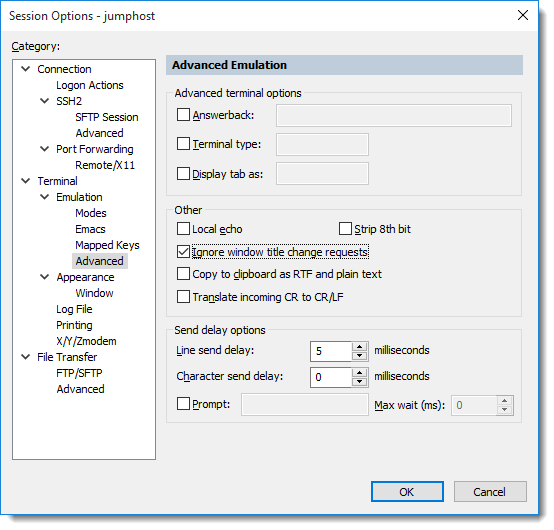
- Select the Terminal / Emulation / Advanced category and make sure the Ignore window title change requests option is enabled. This step is taken because we want the tab name to always reflect the name of the secondary host to which you'll be connected.
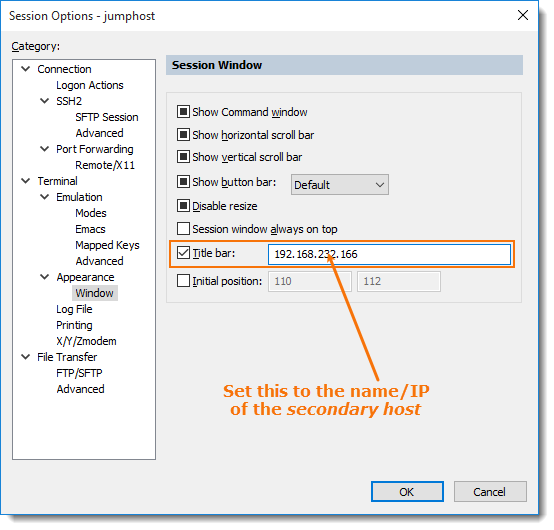
- Select the Appearance / Window category and enable and set the Title bar to match the hostname or IP address of this specific secondary host. This is done to set the initial tab/window title to reflect the secondary host's name/IP.
- Press the OK button to save your changes to the current session.
- Close the tab you have open that is currently connected with the session you just edited.
- In the Session Manager, rename the session you just edited to match the Secondary Host's name/IP.
- Connect to the host to see if it works. If you don't see SecureCRT attempting to run the ssh user@secondary_host command, then it most likely means you didn't set up the first Expect entry in the Logon Actions correctly. Review what the shell prompt on your jumphost looks like and edit the first Expect entry in the session's Logon Actions category to match the last portion of the jump host's shell prompt. Keep editing and testing until you have the session configured to get you all the way connected to your secondary host by simply double-clicking on the session's entry in SecureCRT's Session Manager.
Creating Subsequent Sessions: Copy the existing session
Once your initial setup is complete, and you have a session that gets you connected to the jump host and automatically runs the remote ssh command to get you to the remote host, you get to leverage the work you've just accomplished.
To create sessions for other hosts behind this same jumphost/gateway:
- Make a copy of the existing session you created in the initial setup described above.
- Right-click the session and choose Copy
- Right-click the session again and choose Paste
- Or, select the session in the Session Manager and then press the Ctrl+C and Ctrl+V shortcut keys in sequence to do the copy and paste.
- Rename the copy you just made to reflect the name of the additional secondary host you want to reach.
- Edit this new copy's session properties to reflect the additional secondary host you're targeting:
- In the Logon Actions category, change the first Expect…Send entry such that the ssh user@host command reflects the additional secondary host's name/IP.
- Select the Appearance / Window category and set the Title to match the hostname or IP address of the additional secondary host's name/IP.
How does this approach benefit you in the long run?
SecureCRT allows you to edit the properties of multiple sessions at once. See the Making Configuration Changes to Multiple Sessions tip.
When editing multiple sessions in bulk, the properties of the first session are shown in the Session Options window.
When editing the Logon Actions portion of multiple sessions at once using this mechanism, the following is possible:
IFF (IF and only iF):
- All of the sessions have the exact same number of Expect/Send rows, and
- You modify exactly one (and only one) value from either the Expect or the Send field and
- You are running SecureCRT 7.3 or newer (earlier versions of SecureCRT did not support this surgical logon actions modification capability)
Then that same value, if present in the other sessions, will also be changed without affecting the values of the other Logon Action rows.
WARNING: In every other scenario (e.g. if you're running a version of SecureCRT pre 7.3, or if you change more than one token element of the Logon Actions field), the result will be that all of the sessions being edited will have their Logon Actions' rows (Expect/Send fields and all) set to match every component of the first session's Logon Actions (the one that is visible as you're editing Session Options - Multiple)
This means that if you have a password saved in a Send field, and that password is present in the Send fields of other sessions currently being edited, changing only that password field will result in that password being updated in all of the sessions, without any of the other Expect or Send field values being modified/lost.
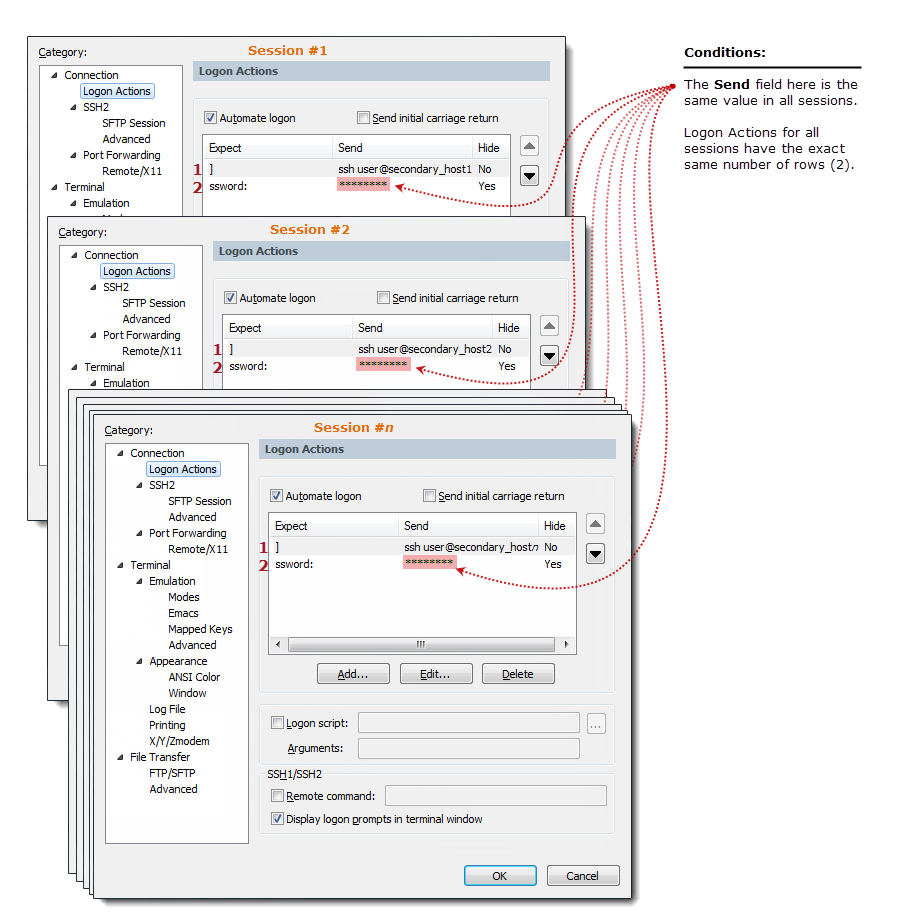
This graphic represents the concept of "n" sessions being edited in bulk, and the ssh user@… portion of the Logon Actions (the Send field in row 1 of each session) has a unique host name different for each session.
- The first session has: ssh user@secondary_host1
- The second session has: ssh user@secondary_host2
- The pattern continues with a different hostname in the Send field of the first row of each session being edited all the way until the nth session which has: ssh user@secondary_hostn as the target
The idea is to modify only one Expect or Send field in one row and nothing else. If this singular edit approach is what you do when editing sessions in bulk, then all of the sessions will be modified such that whatever Send or Expect value you changed will have that same old value updated to the new value, and the remaining Logon Action rows and their Send/Expect fields will remain as-is.
With the bulk-editing capability described above, if the password for these hosts ever changes, you would:
- Right-click on the folder containing all of these sessions and choose Properties
- Select the Connection / Logon Actions category.
- Locate the Expect…Send entry that is responsible for sending the password. Select this entry and press the Edit button.
- Enter the new password in the Send field.
- Leave everything else as it is; making any other changes could result in making all of the other sessions' Logon Actions look exactly like this session's — that would mean all sessions are ssh'ing to the same remote host).
- Press the OK button.
Note: As a point of caution, in the event that you're unsure of how this works, and in case you inadvertently modify two fields instead of one, it is advised that you consider adopting the habit of performing a Tools / Export Settings… backup operation prior to attempting such a change so that you can restore your Logon Actions if the bulk edit operation gets botched in error.